Thursday, March 31, 2005
How I Brew
Below is the beginning a series of posts showing how I make my beer. Starting with this post there are a series of 26 sequential postings, all dated in March '05. How I Brew - A photo-article contains all 26 posts.
The photos and text illustrate the techniques, equipment and supplies I use. Since I have shown some images of supplies and equipment, I would like to mention my main source of supplies: Beer and Wine hobby of Woburn MA, URL: http://www.beer-wine.com/. They are an excellent mail order operation and I am very satisfied with them. I have used them for almost twelve years now. Also, I just recently made the kegging move. I bought my kegging set up from: St Patrick's of Texas, URL: http://www.stpats.com/. They have been very cooperative with me and I have enjoyed kegging greatly but I plan to continue with bottling as well. I also plan to get a counter pressure filler and fill some 1 liter bottles with that sytem…should be fun.
When shopping around for my kegging gear, I looked very hard at a few other sites including: http://www.morebeer.com. As far as the kegging equipment goes, I settled on St. Pats because they represented what was for me the best mix of site quality, merchandise variety and cost. However, I intend to continue with Beer and Wine Hobby for my supplies.
Labels: 1 of 26
Gear and supplies

Some shots of my gear and supplies. Most of the equipment I have used for at least ten years. I did recently replace all of my plastic buckets as they were getting pretty dis-colored and scratched up.
homebrewlog
Labels: 2 of 26
Wednesday, March 30, 2005
Grain crushing set up

This is my grain crushing set up. It is a MALTMILL brand I bought about ten years ago. It has hardened case rollers with a coarse surface. Both rollers are geared. There is a width adjustment allowing you to vary the setting. In this case I am making a Weizenbier so I adjust it down as fine as it will go. The mill is designed so that the rollers can never be adjusted so close that they touch.
homebrewlog
Labels: 3 of 26
Tuesday, March 29, 2005
Milling

Milling. I use a Soehnle scale that was given to me as a gift. I have had it about eight years. It uses AA batteries. It works great, easily measuring from a few ounces up to five pounds. It is quite accurate as I have confirmed it in a variety of ways including weighing sacks of grain sent to me from supply stores. When I run grain through my mill I use small scoops and pour slowly so as not to overload the mill and burn out my drill. It takes me about 5-10 minutes to do 8-10 lbs. of grain. The guy who made it put a small marker on what is considered to be the ideal setting for basic pale malt. It works pretty well although I have tinkered with it some. Since there are no husks with wheat, I always set for the finest crush as I can get. I think I mentioned that earlier, oh well. The mill sits on top of a bottling bucket and this is what I use to hold the batch until I start the mash. I usually crush grain the evening before I do a batch and I like to start a batch first thing in the morning.
homebrewlog
Labels: 4 of 26
Monday, March 28, 2005
Mash Water measuring and preparation

I have used this combination of a five gallon stainless steel pot and an eight gallon ceramic coated canning pot. I use the five gal pot to measure out mashing water in gallon increments and I also use it for sparge water. I use the eight gallon pot for mashing and boiling. I have had both of these pots for about ten years. I use the technique discussed in Millers, Brewing the Worlds Great Beers. It is 1.33 qts. of water per pound of grist. So, for example a 9 lb grain bill will mean 11.97 qts of water or almost exactly 3 gallons of mash water.
homebrewlog
Labels: 5 of 26
Sunday, March 27, 2005
Mashing In

As mentioned., the main book I use is Millers Brewing the Worlds Great Beers. His mashing steps are among the simplest and I have had great success. He advises to heat the mash water to 11F over the mash temp. Then add the grain and stir it in. My grain loads vary from 7 to 10 lbs. and in every case the temp settles right at the point the recipe calls for. I use one of those aeration paddles for a lot of things including stirring mash. I use Taylor analog food service thermometers which I calibrate frequently. I keep a couple of high temp range ones and a couple of low temp range ones. I never mix them. I use boiling water to calibrate the high temps and I use ice water to calibrate the low temps (212F is the boiling point as I am at sea level here). People like to criticize the low temp calibration method but the freezing point and the thawing point is 32, so a glass packed with ice and a little water will give you 32 and you can set your thermometer off that. Anyway, these analogs are only accurate to within +/- 2-3 degrees. I occasionally check them against digitals of a variety of manufacture and I use two at the same time sometimes. I guess the bottom line is that I always get a good mash .or at least one I am satisfied with.
homebrewlog
Labels: 6 of 26
Saturday, March 26, 2005
Adjusting PH

At this point, I check the PH to get the mash into the optimal PH range for mashing. I collect a little mash liquid in a spoon and set it on the edge of the sink. I blow on it a bit to cool it off. I dip a PH strip in the liquid and drag the excess off the strip by dragging it along the edge of the spoon. Then I compare it to the scale. In this case the PH is high, about 6.2. It needs to be between 5.0 and 5.7. I add about a half TSP of gypsum, stir it in well and check it again. The area I am in now, the mash seems to always need about 1 to 1.5 tsps of gypsum to get within range. I have been in other places where I have added calcium carbonate. I have thought about buying a PH meter but have never gotten around to it. Maybe one day I will try one out.
homebrewlog
Labels: 7 of 26
Friday, March 25, 2005
Mashing

I have settled on a one temp, stove top mashing procedure. I have been very happy with it. Once I set my mash, I leave the kettle on the stove top, covered. I check it every 15 minutes for temperature and I give it a good stir. The temp usually drops of 3-5 degrees in those 15 minutes. I turn the heat back on stir and check my temp until it gets back to mash temp, usually 150F. I cut the heat, continue to stir for a few more seconds, cover the kettle and let it sit. I mash for 1:45 to 2 hrs. The Miller book advises two hours but sometimes I get impatient. In the beginning I also did a conversion test with iodine but I quit doing that. I just use time and the visual verification that the wort is clarified. I have always had fairly clear beer and I have always had decent conversion results. I have tried protein rests and compared them to no protein rests and I could never tell a worthwhile difference in the final product so I quit doing them.
During the mash, I get my sparge water ready. I used a 5 gallon stainless steel boiler and a smaller stainless steel spaghetti boiler, about 2.5 gals. I fill them up with tap water, about an inch from the top and begin heating to 160-170F. I used to acidify my sparge water with lactic acid but I quit doing it because my yields were no different whether I did or didn't.
I am starting out with about 6.5 to 7 gals of sparge water. Also, there is anywhere from 2 ¼ to 3 gals of water in the mash. Seems like a lot of water to end up five gallons of beer..more on that during sparging and boiling.
homebrewlog
Labels: 8 of 26
Thursday, March 24, 2005
Sparging set up
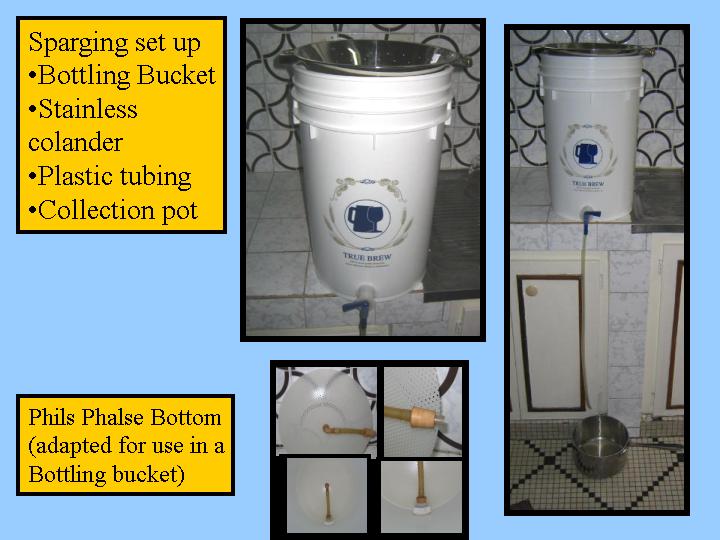
Shown are a few shots of the sparging set up. I use a Phil's Phalse bottom, bottling bucket with spigot, a colander (to sprinkle sparge water), a section of tubing and collection pots from the kitchen. I set this up during mashing and while sparge water is heating up.
homebrewlog
Labels: 9 of 26
Wednesday, March 23, 2005
Sparging set up (cont)

These shots show how I get everything set up for transferring the mash to the sparge bucket. I am a bit fastidious so I put a cloth in place to keep from getting the side of the sparge bucket gooped up with sweet wort. I usually do a mash out, pushing the temp up to 165F. I then move the mash pot over beside the sparge bucket and get everything else ready.
homebrewlog
Labels: 10 of 26
Tuesday, March 22, 2005
Mash transfer from mash pot to sparge bucket

Probably dont have to with a Phil's Phalse bottom but I always put some foundation water in before I start the transfer. Using a pint cup I start ladling the mash over to the bucket. I try to lay it onto the bottom as gently as I can and just keep ladling until it is all transferred. I use a rubber spatula to get everything out of the mash pot into the sparge bucket. I then rinse out the mash bucket because it will now be my wort collection pot and then my boiler. The bottom left photo shows the mash just after having been transferred. Above it is the colander I use to sprinkle the sparge water.
homebrewlog
Labels: 11 of 26
Monday, March 21, 2005
Re-circulating wort

I start the re-circulation process and continue it until I get it to a fairly clear point. These pictures are not of the same batch but they illustrate how the wort is initially cloudy and then as the filter bed sets up it becomes fairly clear. Once the re-circulating is done, I transfer the worth over to the boiler, put it on the heat and start adding sparge water through the colander onto the grain bed. I use enough sparge water until I get the wort up to about 2 inches from the top of my boiler. Over time, this point has proven to the point I need to be at when I start my boil. Factoring in evaporation, absorption of wort into hop leaves, what has to be left behind when racking wort off the trub and spent yeast all have led me back to the "two inches below the rim" rule of thumb.
homebrewlog
Labels: 12 of 26
Sunday, March 20, 2005
Starting the boil
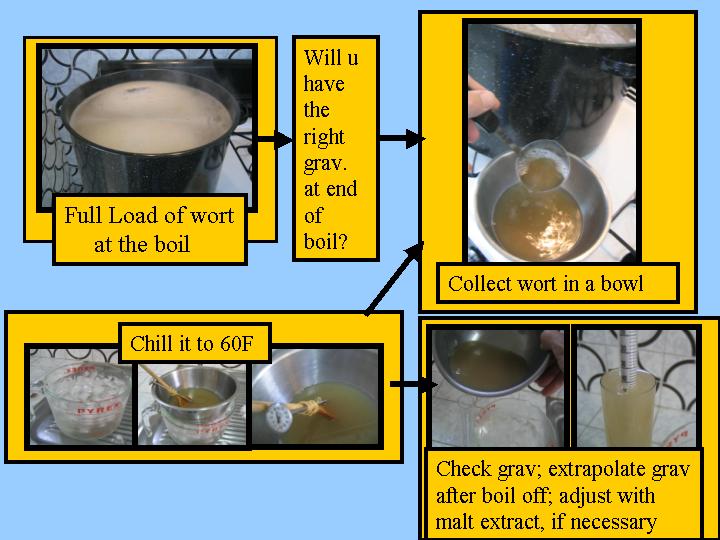
I take an immediate gravity check after I have finished sparging and while I am waiting for the wort to come to full boil. I do this to see if I have had an efficient enough mash. Also, if I want to adjust the sugar content up by adding something I can at this point as it will be subjected to the full boil time.
I seldom have to do any adjusting but I always do the check. For example, if I am shooting for a range 50 to 55 grav at pitching I will need a grav at this point of about 45-48. If it is around there, the reduction of wort from boil off will increase the density and get me to the 50 to 55 range. If I have to adjust the sugar content up wards I add a half pound of dried pale malt extract and check it again.
I also add any additional sugars a recipe may call for at this point. For example brown sugar for a Brown Ale.
To get an accurate grav, I force cool it down to 60F. This way, I do not have to adjust the grav reading based on its actual temp as compared to the base temp of 60F.
homebrewlog
Labels: 13 of 26
Saturday, March 19, 2005
The boil

I usually boil for 75 minutes. I add bittering hops 45 minute point; aromatics at 15 min; Irish Moss at 15 min.
homebrewlog
Labels: 14 of 26
Friday, March 18, 2005
Wort chilling starts

Once the boil is finished I move the pot over beside the sink and get ready for the cooling phase. I use this old immersion wort chiller and I have been very happy with it. Where I am now, the ambient water temp is about 85F. So, I run tap wtaer through until I get down to about 100F, taking about 15 minutes. The Bottom right photo shows hot and old break circulating around.
homebrewlog
Labels: 15 of 26
Thursday, March 17, 2005
Wort chilling continues

While the wort is boiling I set this rig up to run truly cold water through my immersion chiller. As mentioned, I use the tap water first and I have this rig ready to switch to when I get the wort to 100F.
The cooler is full of ice and water and I used gravity to circulate it through. I get the wort down from around 100F to 75 in about 10 minutes. I pretty much am exclusively an Ale brewer so that is why 75F interests me.
There are some reasons why I settled on Ale brewing. I am in a fairly warm area of the world for one thing. Another point is that I do not have a second refrigerator or any other gear to create fermentation conditions at lager temps. I have made some lagers at Ale temps and have been happy with them but, other than CA common, I have not done a lager yeast at Ale temps for years. At some point, I want to try lagers but for now it is Ales.
homebrewlog
Labels: 16 of 26
Wednesday, March 16, 2005
Preparing for wort transfer to the fermenter
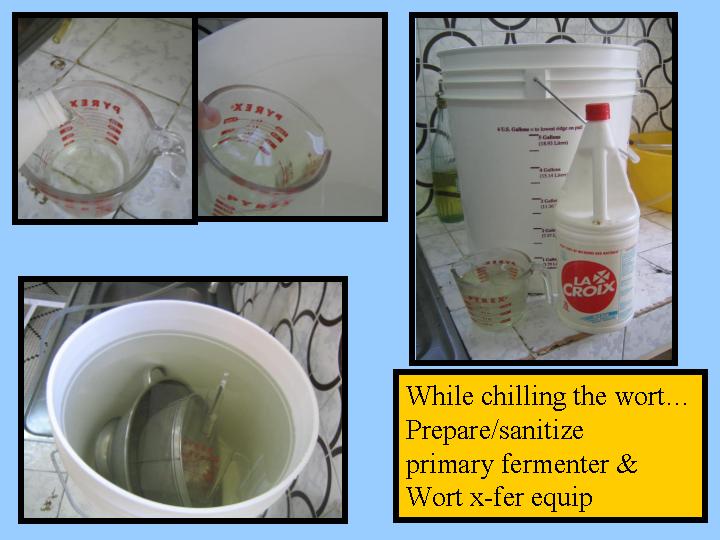
While the wort chilling is going on, I get the fermenter bucket and associated wort transfer equipment ready. I have always used bleach and water to sanitize with. I also have always quickly rinsed off the bleach/water solution with tap water. This process has always worked for me. I have never lost a batch. Lucky or it works, not sure which.
homebrewlog
Labels: 17 of 26
Tuesday, March 15, 2005
Wort transfer to the fermenter

These shots show everything at the ready for wort transfer and then the actual transfer. I almost always use hop plugs, so I strain them out through a screen colander. This process also gives the wort a good initial aeration.
homebrewlog
Labels: 18 of 26
Monday, March 14, 2005
Pitching yeast & aerating wort
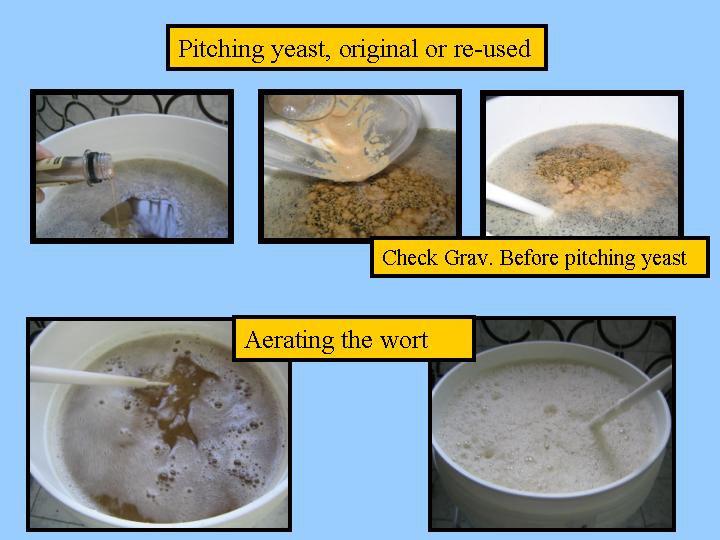
I use White labs yeast most of the the time and I also re-pitch, so I have shots of both here. I uses an aeration paddle to froth up the wort, doing this a couple of times over the next few hours after pitching. I generally see the fermentation kicking in between 6 and 18 hours.
homebrewlog
Labels: 19 of 26
Sunday, March 13, 2005
Waiting for fermentation to start

I keep my fermenter in a large bathroom in the house I currently live in. It is quiet and fairly temperature stable. It had worked well since living here.
homebrewlog
Labels: 20 of 26
Saturday, March 12, 2005
Secondary fermentation

Sometimes I rack to a secondary fermenter, sometimes I dont. If I am making a Weizen Bier for example, I do not. When I do rack to a secondary fermenter and I want some clarity, I use Polyclar. I prepare the slurry with some of the wort I used to check the gravity and I dump it in near the end of the siphoning. During my boil, I always use Irish Moss and during the wort transfer here, I use Polyclar. This combination has worked well for me. I almost always get the yeast settled out and the Polyclar prevents most of the chill haze. I have also eliminated chill haze with gravity, chilling the beer to near freezing and letting it sit for about eight weeks. It worked but it was very slow.
homebrewlog
Labels: 21 of 26
Friday, March 11, 2005
Secondary fermentation (cont)

These shots are a continuation of racking to a secondary fermenter. I used to attach the siphoning hose to the racking tube empty and suck the beer down with my mouth. I recently changed to filling the hose with evaporated water, which is very sanitary. I switched because we have a water distiller where I live, so I have sanitary water on tap. I must point out that when I used mouth suction to get the siphon going, I never had a ruined batch. I collect my yeast slurry in sanitized storage containers, put a layer of saran wrap across the top and then put the lid on. I then store it in the back of my refrigerator.
Occasionally I will krausen a batch, using the procedure in the back of Papazian's book. It always worked well but I could never tell the difference between the head from corn sugar and from a krausened batch. Anyway, I did it a few times and it was kind of cool because that is the way they used to prime their beers in the old days, so they say.
homebrewlog
Labels: 22 of 26
Thursday, March 10, 2005
Bottling
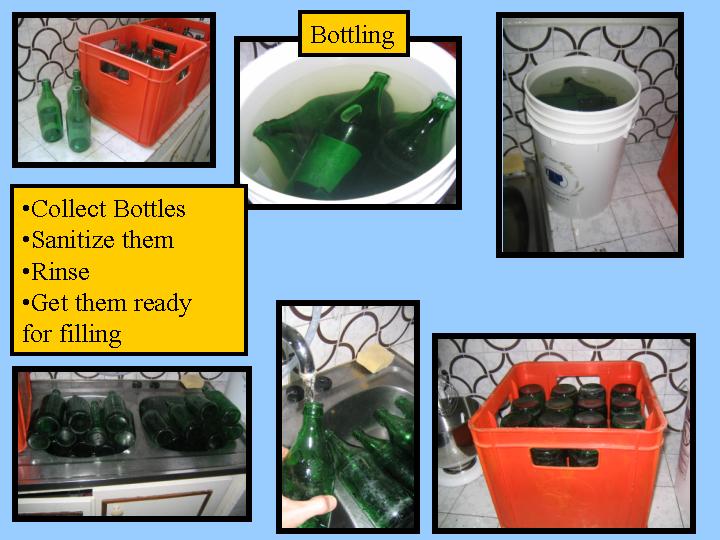
In my current location I am using .62 ltr bottles originally containing Gazelle beer produced by the local brewery here. It is the poor man's beer in this country. A low alcohol content and cane sugar adjunct but it is generally drinkable and cheap. I drank my way through about ten crates to generate my bottle inventory. Since I move around quite a lot, I usually arrive in an area and shop around for beers utilizing bottles I might like. In Germany for example, I use the standard .5 liter returnables that are everywhere. I lived in Haiti for awhile and they had excellent 12 ounce returnable in a shape and thickness I had never seen anywhere else.
These gazelle bottles are unique for me to. Two racks, consisting of 16 bottle each make up a little over 5 gallons, so they work out pretty well. I have always capped, never buying the Grolsch style ceramic caps. I have drank the real thing when I lived in Holland but I wasnt brewing back then. I have thought about converting to these type of bottles but I realized I don't really mind capping bottles. In fact, I kind of like it. So, I stick with returnables.
homebrewlog
Labels: 23 of 26
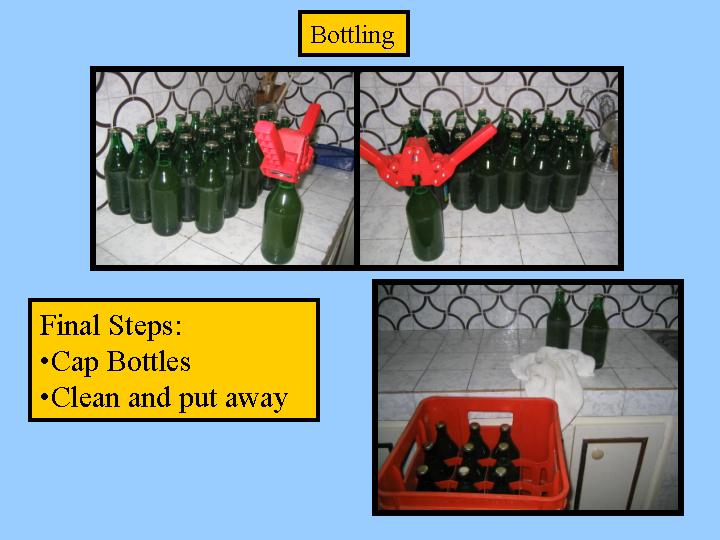
Wednesday, March 09, 2005
Bottling (cont)

For priming I almost always use corn sugar. I sometimes use malt extract and I sometimes krausen. I have had good results with all options. The differences have been negligible, so I find myself using corn sugar the most. The bottom, right hand shot shows me filling a 1 liter San Perigrino Mineral water returnable bottle. I was lazy and didn't soak off the label until later. Anyway, I never saw a one liter returnable San Perigrino bottle, so I started buying them until I got enough to do a batch. It was kind of nice, seeing those elegantly shaped, large beer bottles but I found I didn't like having a 1 ltr serving to deal with. So, I am back to my Gazelles for now.
homebrewlog
Labels: 24 of 26
Tuesday, March 08, 2005
Bottling (cont)
Monday, March 07, 2005
Kegging

Since living here, I started kegging. I have the basic set up: five pound C02 bottle, picnic tap and a couple for used five gallon soda kegs. I have force carbonated and primed in the keg. Both work well for me. Like everybody says, kegged beer is the greatest. I agree!
homebrewlog
Labels: 26 of 26
![]()